
Voidol User Guide
Table of contents
3. How to Use Voidol (Audio Setting)
4. How to Use Voidol (Main Screen Setting)
5. How to Install Voice Conversion Model
* Mac App Store version does not support addition of the purchased voicemodel now.
This guide may not be copied or reproduced in any way without the consent of CRIMSON TECHNOLOGY, Inc.
About Trademark
・R.C.voice is a registered trademark of CRIMSON TECHNOLOGY, Inc.
・Voidol is a trademark of CRIMSON TECHNOLOGY, Inc.
・Described company name and product name in this guide are the registered trademarks or trademarks of each company.
Note to use Voidol
・The product and specifications described in this guide are subject to change without notice due to product improvements.
・Also, we have made every effort to complete the contents of this guide, but if there are any errors or notices, please contact us ( https://crimsontech.jp/about-us/contact/?lang=en ).
・Please note that we are not responsible for the effects of the operation results regardless of the above items.
Recommended Audio Environment
|
|
Recommended Audio Environment |
|
Windows |
Using with an Audio interface and Microphone (Recommended driver: ASIO) |
|
macOS |
Using with an Audio interface and Microphone |
In order to enjoy comfortable voice conversion, it is preferable to use an audio interface and a dynamic microphone together.
※ If you use the built-in speaker / microphone without an audio interface,
Please be sure to use earphones or headphones so as not to cause howling and unpleasant noise when you use built-in speaker / microphone.
①Main Screen

1. SETTING
The application setting screen is displayed by clicking the icon.
2. INPUT
Input level and the narrator type referenced during voice conversion are displayed in this section.
3. VOICE CONVERSION MODEL
The character voice you want to convert can be selected. Character names are displayed in a pull-down menu by clicking the either one of two options on the section. If you place the cursor on the character name on the menu, a list of narrator type will be displayed and can be selected. The selected narrator type will be displayed below the left “INPUT” section. By clicking “BYPASS”, Input Voice will be not converted and come to output directly. (The button turns to red when BYPASS mode is working.
4. OUTPUT
You can control the output level in “OUTPUT” section. By clicking “MUTE”, any sound will not come out. (The button turns to red when MUTE mode is working.) In Addition, MUTE mode is switched by pressing space key.
5. DUCKING EFFECT
When playing audio such as music with AUX, Ducking Effect automatically reduces the volume in accordance with the volume of Input voice.
6. MIX LEVEL
When playing audio such as background music using the AUX cable, you can control the mix level of the sound in this section.
7. SPACE EFFECT
Space Effect is the effect which get your voice more spacious. The left section means the type and the right parameter controls amount of the effect.
8. NOISE GATE
Noise Gate can reduce surrounding noise and noise generated by peripheral devices.
Please increase the parameter if the surrounding noise is loud.
②Setting Screen
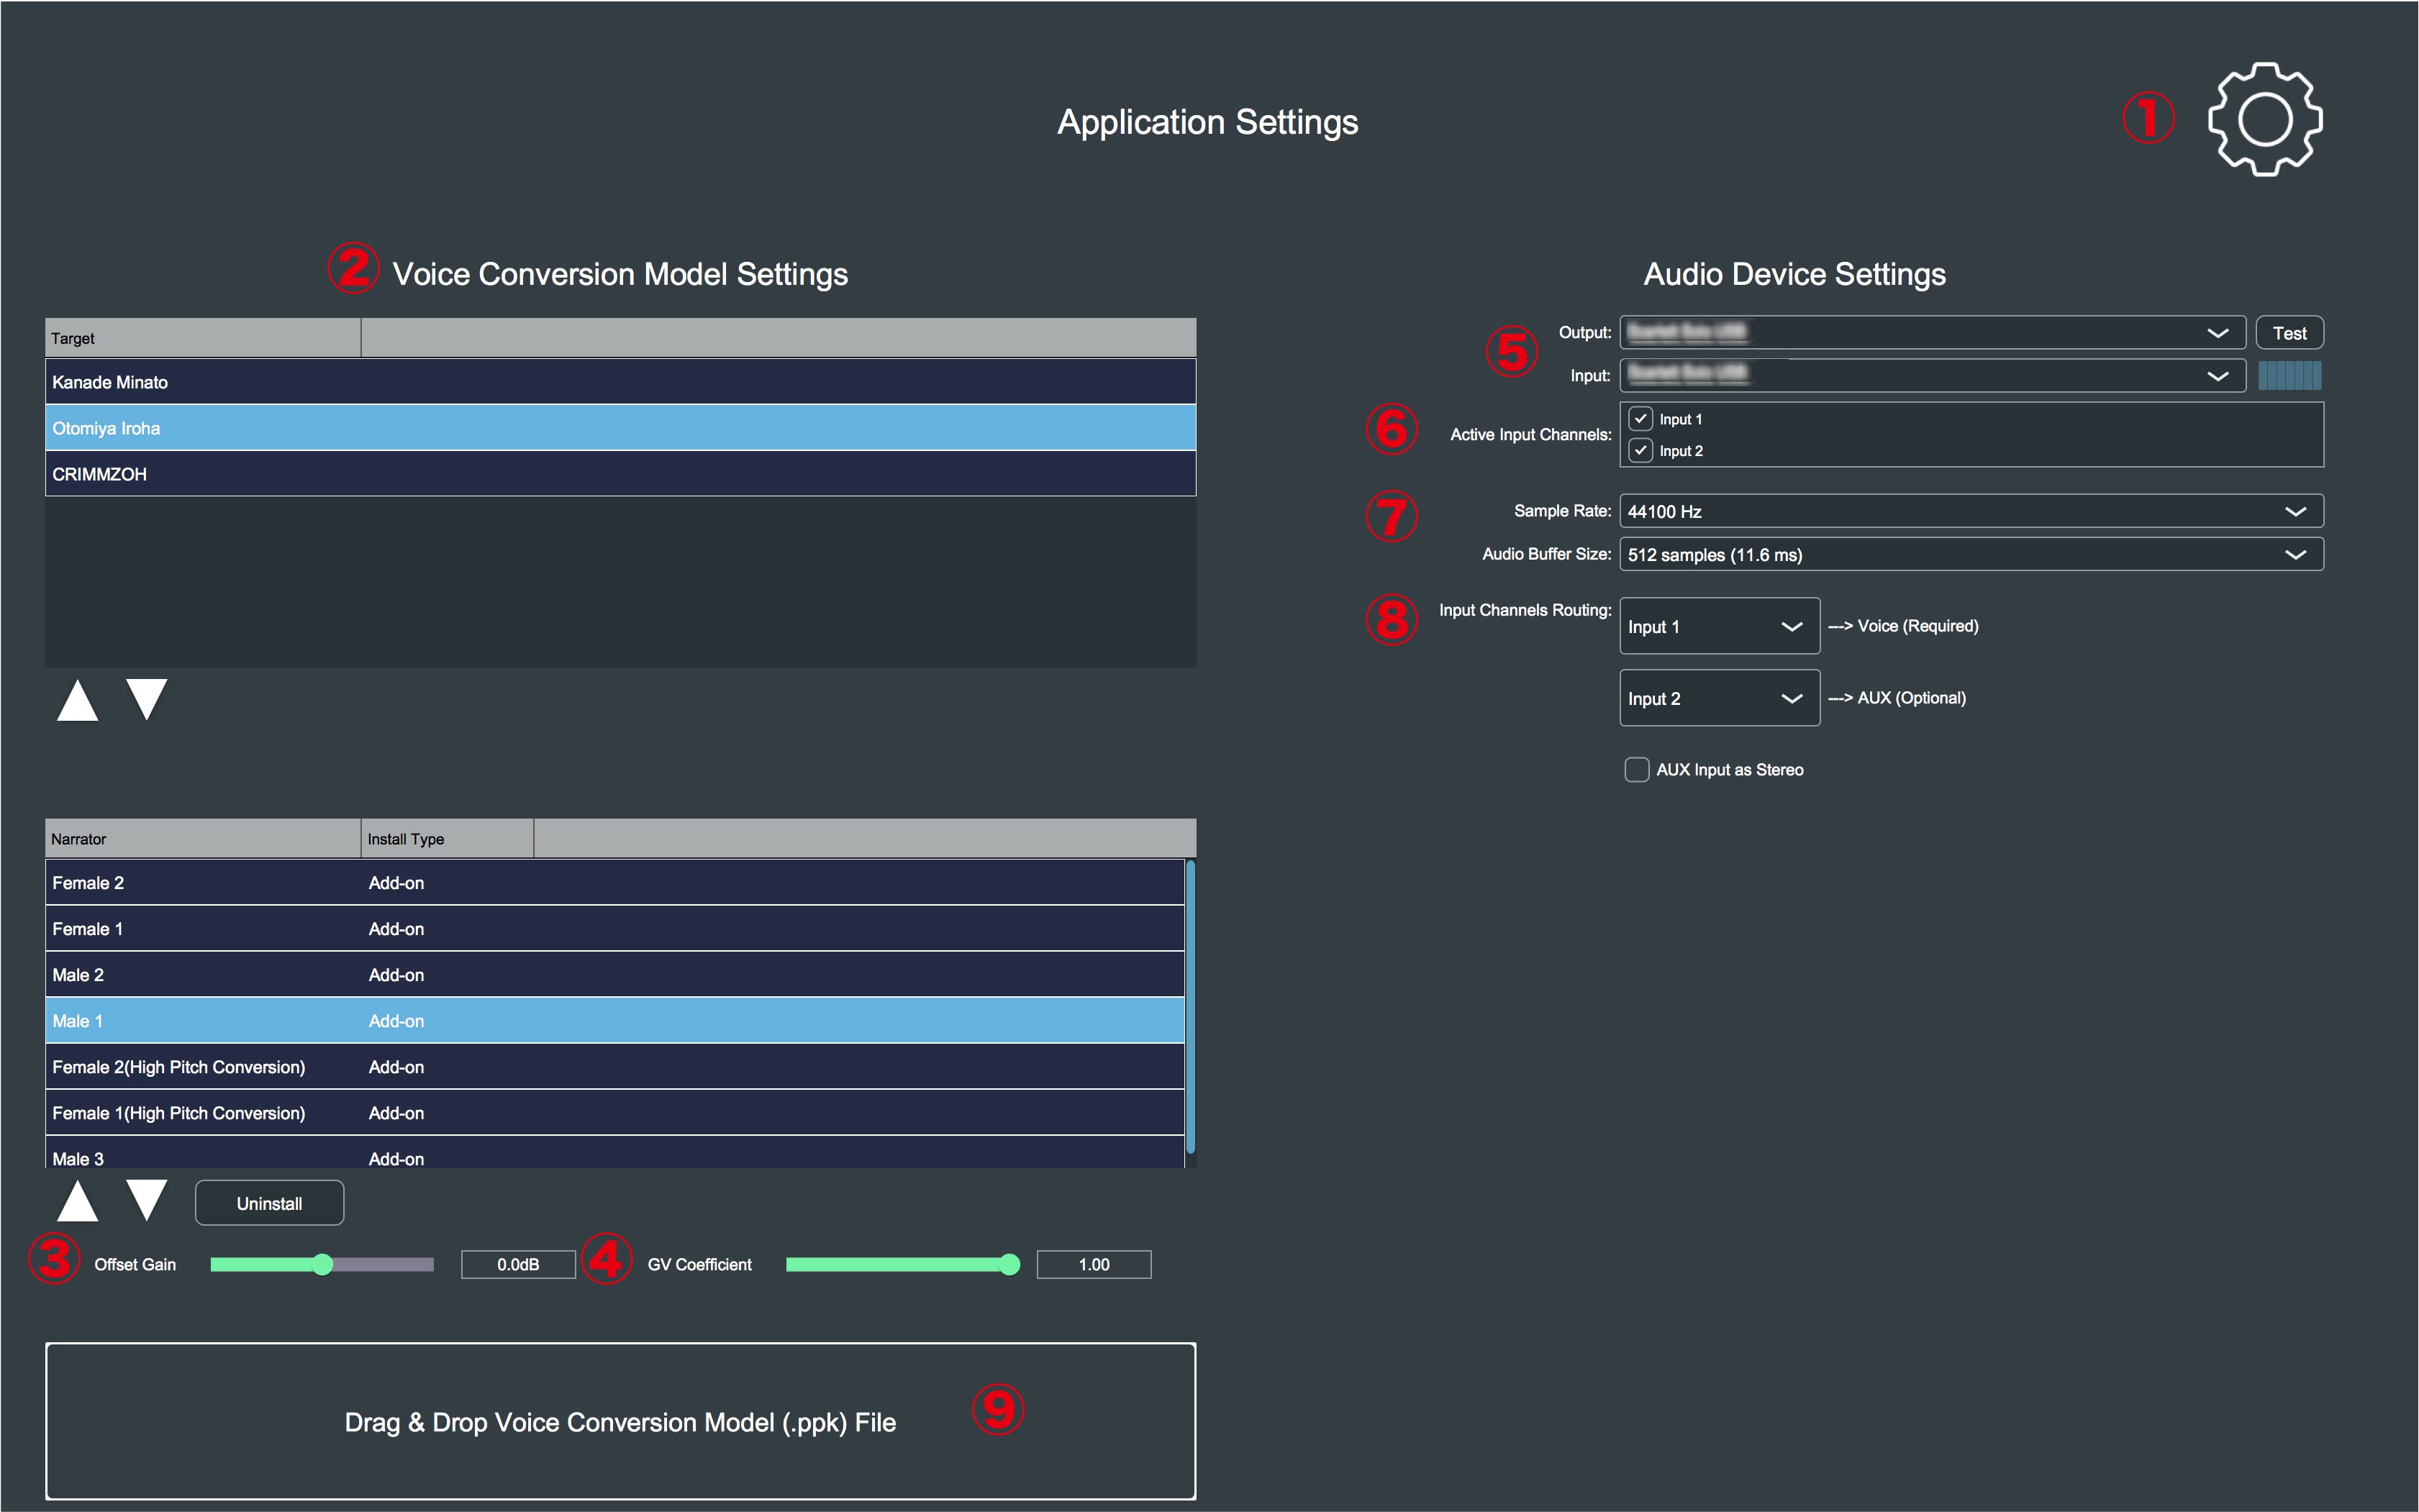
1. Back to Main Screen
Main screen is displayed by clicking the icon.
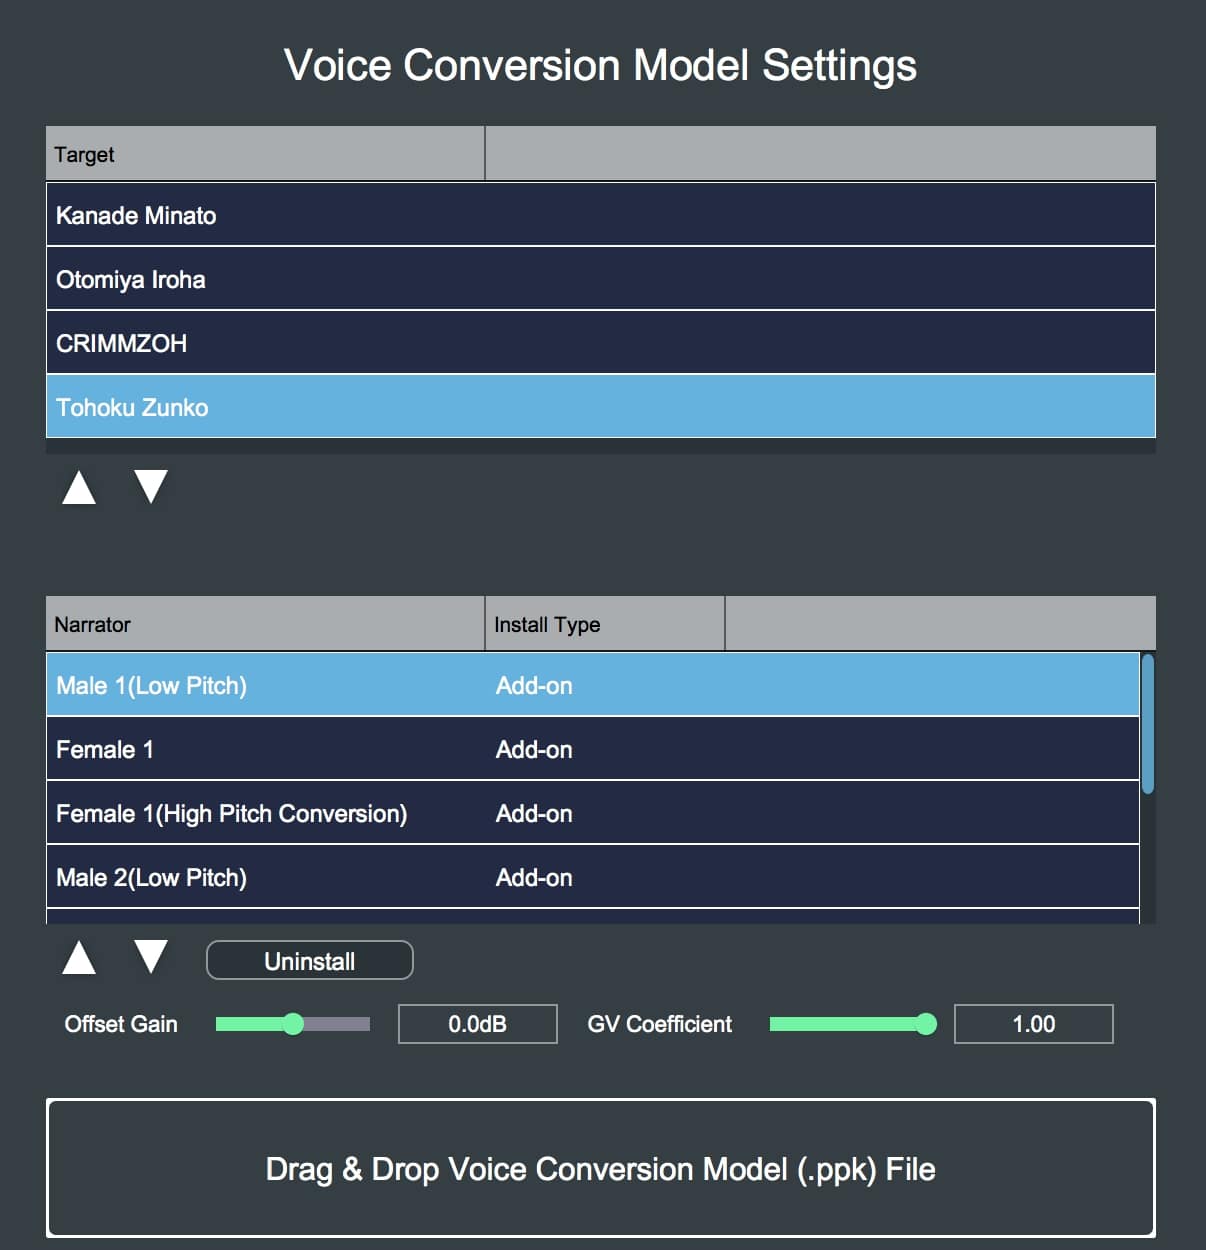
2. Setting Voice Conversion Model
By clicking character’s name, the selected narrator type is displayed below section.
3. Offset Gain
By changing this parameter, it is possible to adjust the volume to suit you for each character.
4. GV coefficient
The parameter called GV coefficient can be adjusted in this section. If you are concerned about distortion in the high frequency range of the converted voice, you may be able to improve it by lowering this parameter.
5. Audio device setting
The audio device can be selected on this section. The setting has difference in macOS and Windows.
6. Active input channels
In this section, you can select active channels.
7. Sample rate & Audio buffer size
Sampling frequency and buffer size can be selected in this section. you can change the values of Sample rate / Audio buffer size to suit your own computer. (Default setting: Sample rate “44100 Hz” / Audio buffer size “512samples (11.6 ms)”)
The setting has difference in macOS and Windows.
8. Input channels routing
In “Input channels routing”, it is possible to select which input is used for voice conversion and which input is assigned to AUX input with the pull-down menu. (Recommended settings:
①Voice Audio→“Voice”/ ②Back ground music etc.→”AUX”). If you want to use AUX in stereo, please check “AUX Input as stereo”, and set both “AUX Left” and “AUX Right”. AUX in stereo is available in the audio device which have more than three input channels.
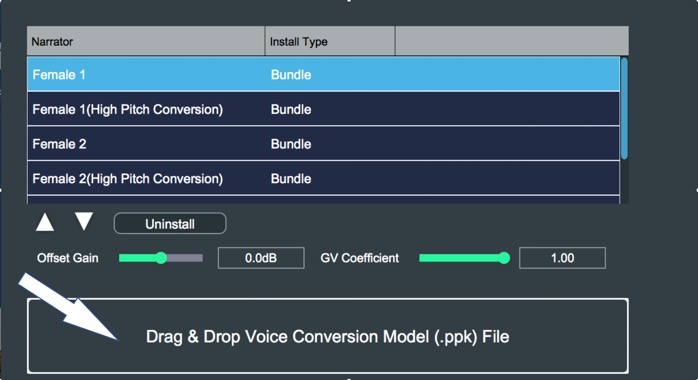
9. Adding the purchased voicemodels
In this section, you can add the purchased voicemodels by drag & drop.
*This section is not available in Voidol purchased in Mac App Store.
In this Chapter and the next chapter, you can learn about the basic usage of Voidol.
Before using Voidol, you need to make the audio-related settings.
For comfortable voice conversion, using an audio interface and a dynamic microphone is recommended.
At the first, you need to make setting of Output / Input.
There is a difference in macOS and Windows, so please check the case for each OS.
○ macOS
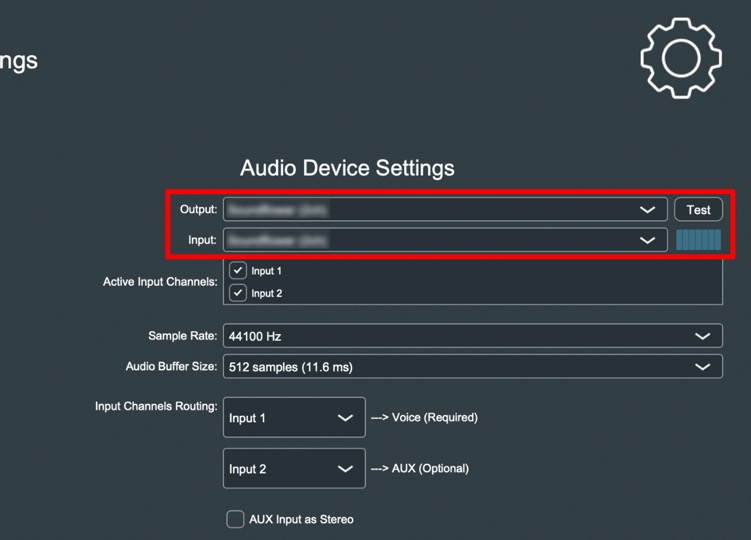
Please select the audio device you use from the “Output” and “Input” menu. If you use an Audio Interface, please select the name of the device.
※The setting without Audio Interface: “output → built-in output” or “input → built-in microphone”.
○ Windows
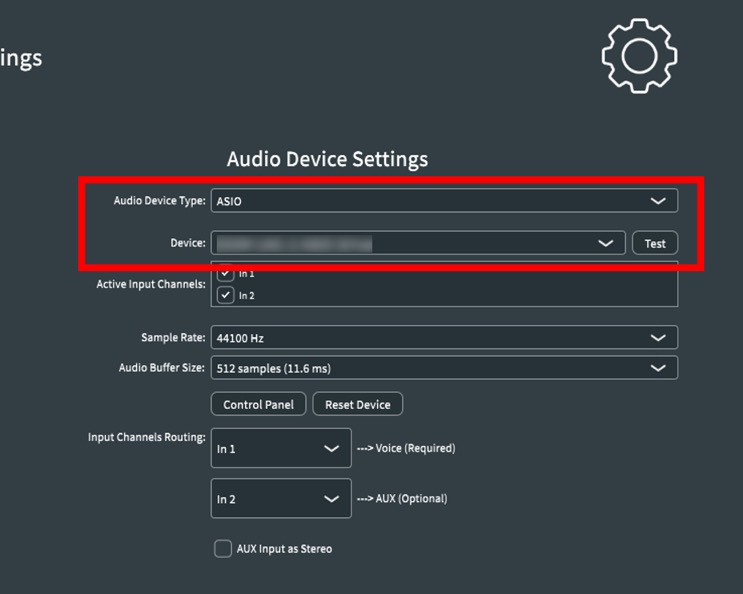
Windows users can select the driver you use from Audio Device Type section.
If you select ASIO driver, please select the audio device you use on Device section.
※The setting without Audio Interface:
Please select the driver such as Windows Audio and DirectSound and make setting “output → built-in output” or “input → built-in microphone”.
Please be sure to use earphones or headphones so as not to cause howling and unpleasant noise when you use built-in speaker / microphone.
※When using ASIO, Input / Output can’t be separated. If you want to make setting of Input / Output separately, please select the driver such as Windows Audio and DirectSound.
② Setting Active input channels
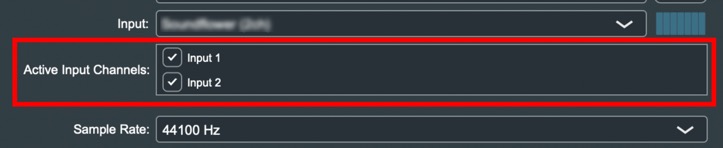
Next, you need to select the channel that you want to enable.
Please make sure that “input1” in “Active input channels” is checked.
And, if you want to use AUX while playing music in the back, please check the box “input2”.
③ Setting Sample rate / Audio buffer size
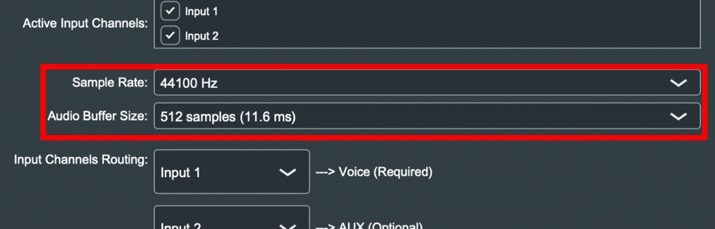
Basically, there are no problems with the default setting, but you can change the values of Sample rate / Audio buffer size to suit your own preferences and PC specifications.
(Default setting: Sample rate “44100 Hz” / Audio buffer size “512samples (11.6 ms)”)
◯For ASIO User

When using ASIO driver, you can use control panel of the Audio Interface.
④ Setting Input channels routing
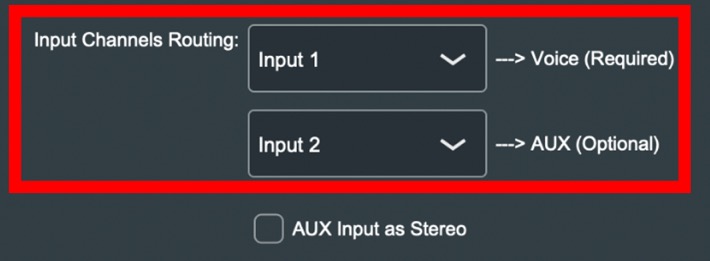
In “Input channels routing”, you can set up which input is used for voice conversion and which input is assigned to AUX input. In the pull-down menu, you can select the input audio (Recommended settings: Voice Audio→“Voice”
/ Back ground music etc.→”AUX”). If you want to use AUX in stereo, please check “AUX Input as stereo”.
In this section, you can learn about how to use the voice conversion of Voidol on main screen.
■Selecting Character / Narrator type and Input / Output
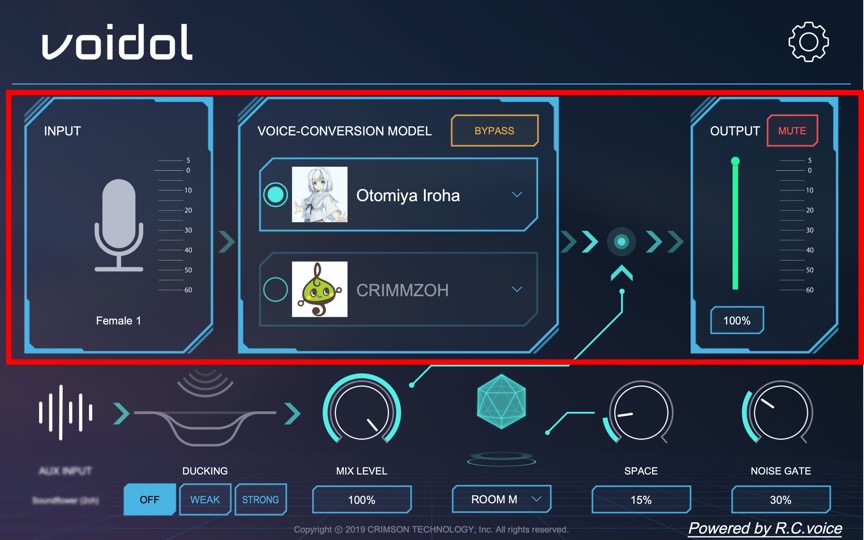
You can select the character voice you want to convert in “VOICE-CONVERSION MODEL” section.
Character names are displayed in a pull-down menu by clicking the either one of two options on the section. If you place the cursor on the character name on the menu, a list of narrators type (type of voice of the user such as Male or Female) will be displayed and can be selected. The selected narrator type will be displayed below the left “INPUT” section. By clicking “BYPASS”, Input Voice will be not converted and come to output directly. (The button turns to red when BYPASS mode is working.)
You can control the volume of output in “OUTPUT” section.
By clicking “MUTE”, any sound will not come out. (The button turns to red when MUTE mode is working.)
In Addition, MUTE mode can be switched by pressing space key.
■Setting Ducking Control / Mix Level Control
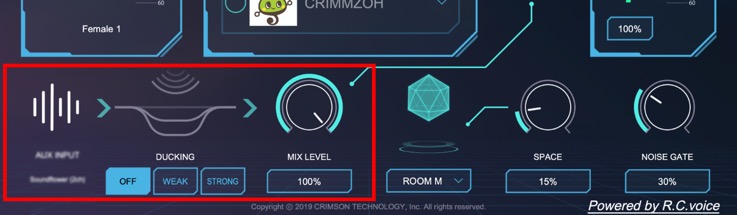
This parameter is available when playing audio such as background music using the AUX cable. You can adjust the intensity of the “Ducking function” and the mix level of the back ground music in this section. (Ducking function is the function which automatically reduces the volume of the other sound in accordance with the volume of Input voice.)
■SETTING SPACE EFFECT
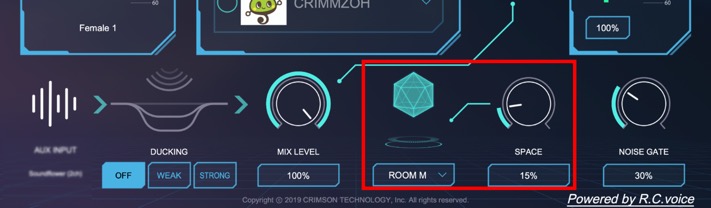
Space Effect is the effect which get your voice more spacious. The left section means the type and the right parameter controls amount of the effect.
■ Setting Noise Gate
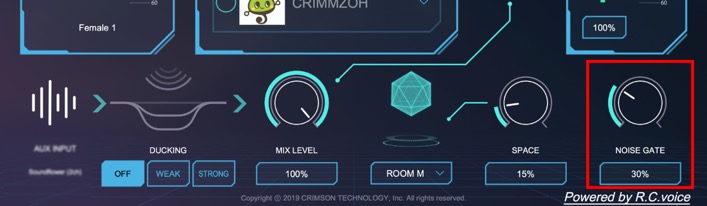
Noise Gate Effect can reduce surrounding noise and noise generated by peripheral devices.
Please increase the parameter if the surrounding noise is loud. But, if you make it too much, the beginning and end of the words may be interrupted. It is recommended to use the effect in the lowest parameter for high quality conversion.
In this chapter, you can learn about how to Install Voice Conversion Model into Voidol.
If you use Mac App Store version or the trial version of Voidol, you can’t install Voice Conversion Model into the application.
① Please open the setting screen and import the purchased voice conversion model (ppk.file) into the above section by drag & drop from the folder.
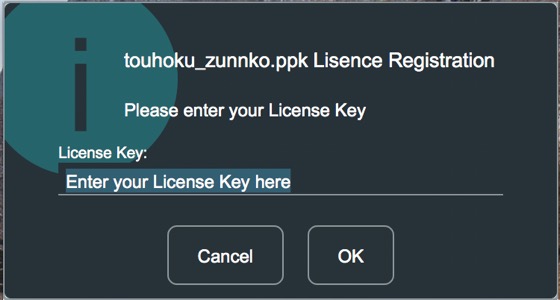
② Please enter the license key you accepted when purchasing the voice conversion model.
Note: The license key has limited number of the install.
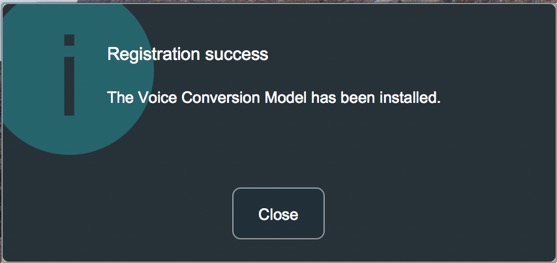
③ If the license key is correct, the installation will be complete and the character’s name is displayed as follows.
1. The pitch of converted voice is too high or low.
Please check narrator type. If you select a narrator type different from your gender, it will not be converted well.
Please select a correct narrator type from "Men 1", "Men 2", "Woman 1", "Woman 2", etc. according to your voice quality.
2. Voice can’t be converted when using Voidol.
Please check the BYPASS mode. By clicking “BYPASS”, Input Voice will be not converted and come to output directly. (The button turns to red when BYPASS mode is working.)
3. No sound from the speakers.
Please check the MUTE mode. By clicking “MUTE”, any sound will not come out. (The button turns to red when MUTE mode is working.) Please note that MUTE mode is switched by pressing space key.
4. Sound is interrupted.
Please check Noise Gate. If the parameter is too high, the converted voice may be interrupted unnaturally. Increase parameter gradually from 0%, and set it to be uninterrupted.
5. There is a lot of latency in conversion. / The converted voice quality is low.
Please check driver you use. If you are using a driver such as Windows audio or Direct Sound, the quality may not improve due to delays or distortion.
Please connect the audio interface with the ASIO driver. If you can’t find ASIO in the audio device settings, there may be a problem with the driver. Please install or reinstall the driver based on the manual of the audio interface you use.
6. Can’t record the converted voice.
Voidol doesn’t have a recording equipment itself, so you need to use a virtual audio device and recording software with Voidol.
(Setting example: Voidol Output → Virtual Audio Device Output →Recording Software)
7. Can’t open Voidol with following warning.
[ Error when trying to open audio device! ]
This problem can be caused by mismatching of sampling rate of input and output in Windows audio setting.
Please try the following settings.
(1) Close Voidol.
(2) Select [Setting] from Windows start menu.
(3) Select [SYSTEM]-[Sound] and open sound setting screen.
(4) From [Related Settings]menu, open [Sound control panel].
(5) From [Playback] tab of [Sound control panel], select the device you want to use as input in Voidol and open the [Properties].
(6) From [Advanced]-[Default Format], select the sample rate you want to use and click on OK.
(7) From [Recording] tab of [Sound control panel], select the device you want to use as Output in Voidol and open the [Properties].
(8) From [Advanced]-[Default Format], select the same sample rate as above and click on OK.
(9) Start Voidol again.
(10) Assign the same device as set above to the [Input] and [Output] in setting screen of Voidol.
8. Can’t open Voidol with following warning.
[ Voidol can’t start because the screen size is small. Please change the screen size and restart.]
If you cannot start up Voidol even though the screen size is WXGA + (1440x900) or higher, please try the following settings.
(1) Select [Setting] from Windows start menu.
(2) Select [SYSTEM]-[Display] and open display setting screen.
(3) In [Scale and layout]-[Change the size of text, apps, and other items], select 100%.
(4) After the above settings, open Voidol again and confirm that it starts correctly.
If the problem persists after trying the above instructions, please contact this contact form (https://crimsontech.jp/about-us/contact/).
Since it is assumed to be purchased after testing with the trial version, we will not refund due to the quality.
In addition, please note that we do not accept telephone or chat support.
Date 2019 8/29
Correction Date 2020/5/8